programming4us


Applications Server

Implementing Edge Services for an Exchange Server 2007 Environment : Utilizing the Basic Sender and Recipient Connection Filters (part 3) - Configuring Recipient Filtering

- Free product key for windows 10
- Free Product Key for Microsoft office 365
- Malwarebytes Premium 3.7.1 Serial Keys (LifeTime) 2019
7/23/2013 3:04:30 AM

7. Using the Exchange Management Shell to Add Blocked Senders

Sender filtering can also be configured through the Exchange Management Shell. Each shell command has its own parameters you can set based on the action(s) performed by the command. There are two commands: Get and Set.

The Get- command is used to retrieve the configuration of the Sender Filtering Agent. For example, entering Get-SenderFilterConfig displays the Sender Filtering configuration on the local system.

The Set- command allows an administrator to enable or disable the agent and modify the configuration of the agent. The following example enables the Sender Filtering Agent and rejects messages from blank senders on external SMTP connections.

Set-SenderFilterConfig -Enabled $true -Action Reject
-BlankSenderBlockingEnabled $true -ExternalMailEnabled $true -Enabled $true

8. Configuring Recipient Filtering

Recipient filtering allows an administrator to block email delivery from the Internet to a specific email address. Email that is routed through Receive Connectors is processed by the Recipient Filtering Agent. In addition, recipient filtering can prevent delivery of email messages to nonexistent accounts in Active Directory. This is extremely effective in stopping spam and virus-laden email to abused or commonly named email accounts (for example, [email protected] or [email protected]).

Note

A maximum of 800 email addresses can be placed in this list.


The Recipient Filtering Agent is enabled by default and can be configured using the Exchange Management Console or Exchange Management Shell.

Note

Changes described in this section are applied only to the local system. This is important if you have more than one Edge Transport server in your environment.


To disable the Recipient Filtering Agent using the Exchange Management Console, right-click the agent icon in the action pane and select Disable. To disable the Recipient Filtering Agent using the Exchange Management Shell, run the set-RecipientFilterConfig command with the -Enabled $false parameter.

Example: set-RecipientFilterConfig -Enabled $false

The General tab of the Agent Properties window displays a brief description of the agent and its capabilities, its current status, and the last time the agent’s settings were modified.

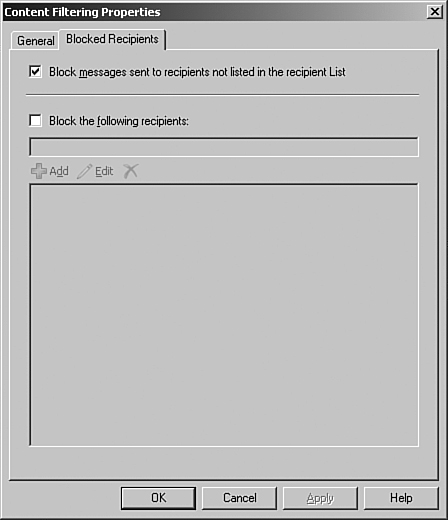
To add email addresses to the Recipient Filtering list, double-click the recipient Filtering Agent in the action pane and select the Blocked Recipients tab, as shown in Figure 2. From here, you can add, edit, or delete entries in the list. You can also enable the Block Messages Sent to Recipients Not Listed in the Recipient List field. Enabling this feature prevents delivery of email messages to nonexistent accounts in Active Directory.

Figure 2. Blocked Recipients tab in the Exchange Management Console.


Note

For the Block Messages Sent to Recipients Not Listed in the Recipient List feature to work, you must first configure the EdgeSync process and Active Directory Application Mode (ADAM) for recipient lookup. 


Tip

Using the Block Messages Sent to Nonexistent Senders can help drastically reduce the amount of email sent to commonly targeted addresses like [email protected], [email protected], and [email protected]. This also reduces the spammer’s ability to identify which email addresses are valid when no response or a response other than “nonexistent user” is returned in a nondelivery report (NDR).


9. Using the Exchange Management Shell to Add Blocked Recipients

Recipient filtering can also be configured through the Exchange Management Shell. Each shell command has its own parameters you can set based on the action(s) performed by the command. There are two commands: Get and Set.

The Get- command is used to retrieve the configuration of the Sender Filtering Agent. For example, entering Get-RecipientFilterConfig displays the Recipient Filtering configuration on the local system.

The Set- command allows an administrator to enable or disable the agent or modify the configuration of the agent. The following example enables the Recipient Filtering Agent and rejects messages to nonexistent recipients on external SMTP connections.

Set-RecipientFilterConfig -Enabled $true -ExternalMailEnabled $true -
RecipientValidationEnabled $true
Other -----------------
- Implementing Edge Services for an Exchange Server 2007 Environment : Installing and Configuring the Edge Transport Server Components
- Exchange Server 2010 : Managing Web and Mobile Access (part 4) - Configuring URLs and Authentication for OWA, Configuring URLs and Authentication for Exchange ActiveSync, Configuring URLs and Authenti
- Exchange Server 2010 : Managing Web and Mobile Access (part 3) - Throttling Client Access, Configuring URLs and Authentication for the OAB
- Exchange Server 2010 : Managing Web and Mobile Access (part 2) - Enabling SSL on Web Sites, Controlling Access to the HTTP Server
- Exchange Server 2010 : Managing Web and Mobile Access (part 1) - Enabling and Disabling Outlook Web App Features, Configuring Ports, IP Addresses, and Host Names Used by Web Sites
- Active Directory 2008 : Managing Security Settings (part 2) - The Security Configuration Wizard
- Active Directory 2008 : Managing Security Settings (part 1) - Configuring the Local Security Policy, Managing Security Configuration with Security Templates
- Active Directory 2008 : Delegating the Support of Computers (part 2) - Delegating Administration Using Restricted Groups Policies with the Members Of This Group Setting
- Active Directory 2008 : Delegating the Support of Computers (part 1) - Understanding Restricted Groups Policies
- SharePoint 2010 : Virtual Machine Setup and SharePoint Configuration (part 3) - Security for the Services Dedicated to BI
- SharePoint 2010 : Virtual Machine Setup and SharePoint Configuration (part 2) - Set Up Your Own VMs on Windows 2008 R2
- SharePoint 2010 : Virtual Machine Setup and SharePoint Configuration (part 1) - Set Up a Pre-configured VM
- BizTalk Server 2010 : WCF SAP Adapter RFCs and BAPIs - Schema generation
- BizTalk Server 2010 : WCF SAP Adapter RFCs and BAPIs - Overview of SAP RFCs and BAPIs
- Exchange Server 2010 Administration Essentials : Understanding Exchange Server 2010 Organizations (part 2) - Using Configuration Containers Instead of Administrative Groups
- Exchange Server 2010 Administration Essentials : Understanding Exchange Server 2010 Organizations (part 1) - How Site-Based Routing Works
- Exchange Server 2010 Administration Essentials : Validating the Exchange Server Licensing
- Installing Configuration Manager 2007 : ConfigMgr Service Manager
- Installing Configuration Manager 2007 : Transfer Site Settings Wizard, Copy Packages Wizard
- Microsoft Dynamic AX 2009 : The Batch Framework (part 6) - Managing the Batch Server Execution Process - Manage Batch Jobs, Debug a Batch Task


Top 10
 
- Microsoft Visio 2013 : Adding Structure to Your Diagrams - Finding containers and lists in Visio (part 2) - Wireframes,Legends
- Microsoft Visio 2013 : Adding Structure to Your Diagrams - Finding containers and lists in Visio (part 1) - Swimlanes
- Microsoft Visio 2013 : Adding Structure to Your Diagrams - Formatting and sizing lists
- Microsoft Visio 2013 : Adding Structure to Your Diagrams - Adding shapes to lists
- Microsoft Visio 2013 : Adding Structure to Your Diagrams - Sizing containers
- Microsoft Access 2010 : Control Properties and Why to Use Them (part 3) - The Other Properties of a Control
- Microsoft Access 2010 : Control Properties and Why to Use Them (part 2) - The Data Properties of a Control
- Microsoft Access 2010 : Control Properties and Why to Use Them (part 1) - The Format Properties of a Control
- Microsoft Access 2010 : Form Properties and Why Should You Use Them - Working with the Properties Window
- Microsoft Visio 2013 : Using the Organization Chart Wizard with new data
- First look: Apple Watch

- 3 Tips for Maintaining Your Cell Phone Battery (part 1)

- 3 Tips for Maintaining Your Cell Phone Battery (part 2)
programming4us programming4us